
Sending automatic emails with excel VBA is a powerful technique that allows you to send bulk emails quickly without having to manually type the message or attach files yourself. This method is ideal for businesses that need to send emails regularly, such as invoices, reports, and notifications.if you’re looking for a way to automatically send emails with attachment using excel VBA, this article has the answer! Furthermore, you’ll get a free template you can use in your daily workflow.
Table of Contents
1.) Why should we use excel VBA to send automatic emails?
1.1)For those who need to send bulk emails every day
In many organizations, it is common to send a large number of emails daily, each with a unique PDF attachment and customized content. Using excel VBA helps automate this process – saving time and reducing human error. This template can be easily adapted to fit your daily workflow.
1.2) For small business owners who don’t want to spend a lot.
Hiring someone to build a custom email automation system can cost anywhere from a few thousand to tens of thousands of baht, depending on the complexity – such as email body customization, file attachments, HTML formatting, logging systems, or custom APIs.
This excel VBA template can be a great alternative – it offers similar value at a free cost (In fact, the template I provide here is worth around a thousand baht.)
1.3) Enhancing efficiency and reducing working time
If we send an email to one person, it takes about 30 seconds. If we need to send email to 100 people, it could take up to an hour. Therefore, using excel to send automated emails can be very beneficial.
1.4)Reducing human error
This helps reduce the chance of sending emails to the wrong recipients or attaching the wrong files. You can also set up automatic formatting to ensure everything is sent correctly.
2.) How to use this excel VBA File
2.1)The excel sheet contain a following columns for email automation
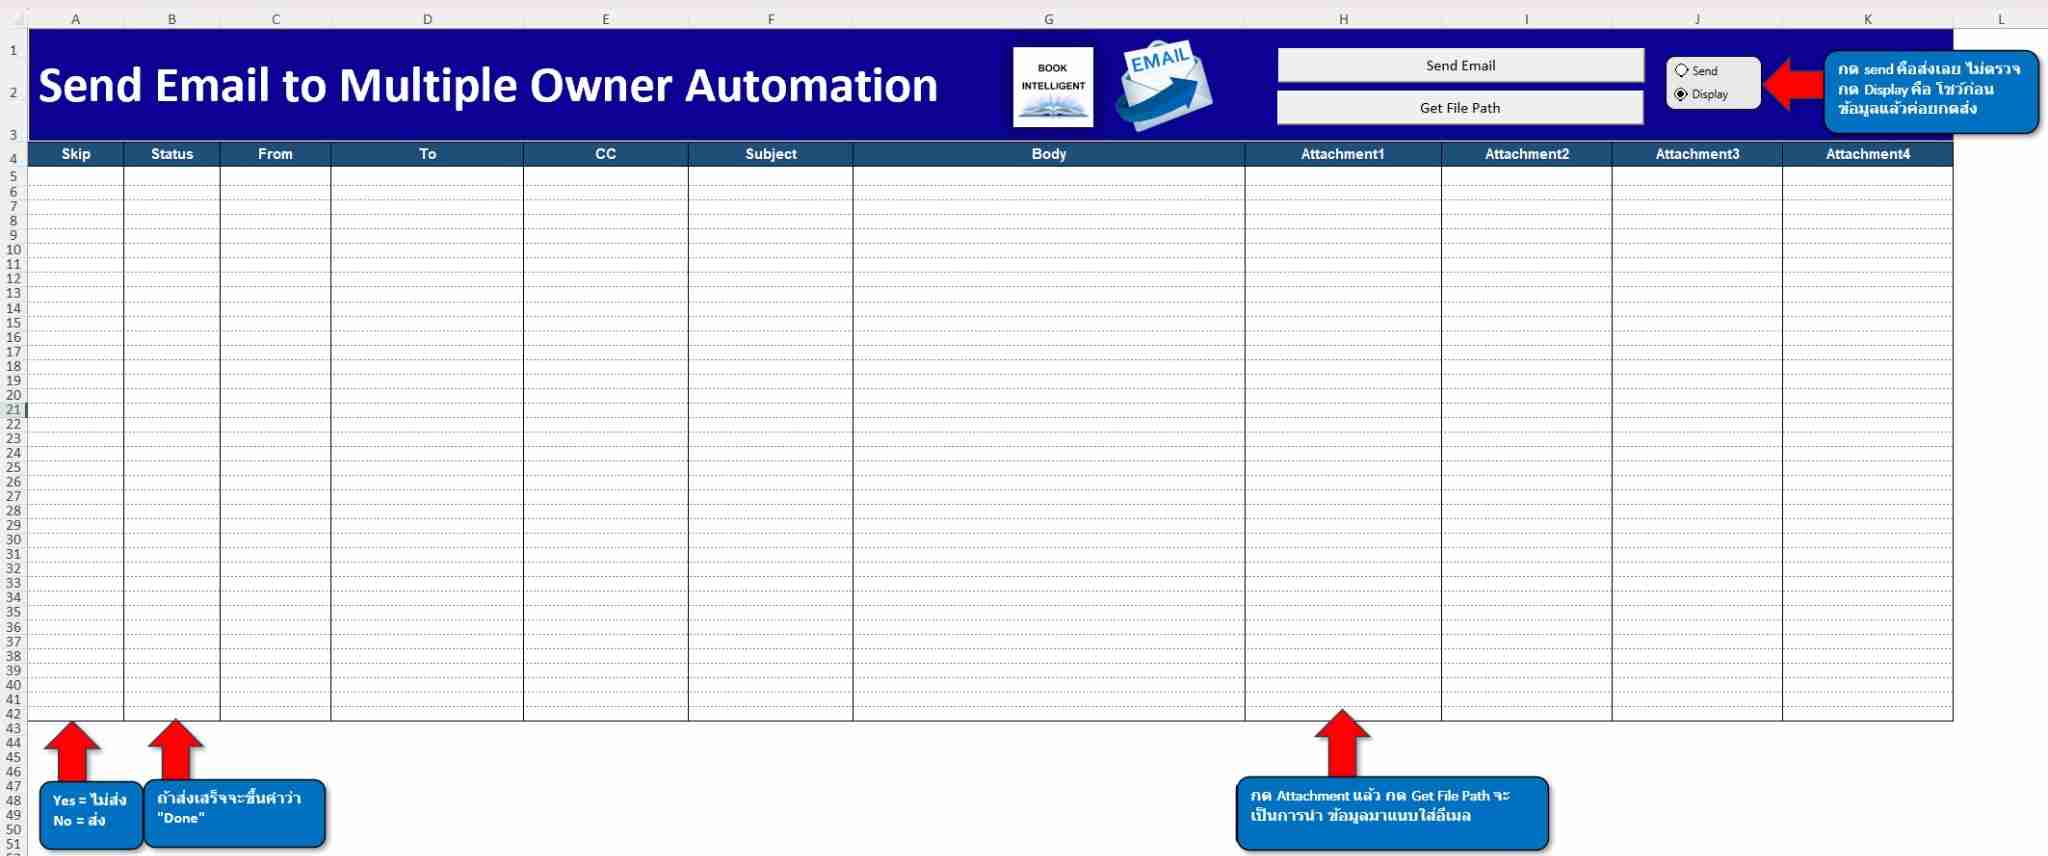
- Skip : A dropdown menu allows you to select “Yes” (to skip sending) or “No” (to send this email).
- Status : Shows “Done” after the has been sent successfully.
- From : The sender’s email address.
- To : The recipient’s email address.
- CC : The email address to be copied (Carbon Copy)
- Subject : The subject line of email.
- Body : The main content or message of the email.
- Attachment : You can attach up to 4 files. Click the “Get file path” button in the cell to browse and select the files you want to attach.
- Send / Display : You can tick either option.
- Send : The email will be sent immediately.
- Display : The email will be previewed before sending.
- Send email : Click this button to run the file and start the email automation process.
2.2) How to use

When you open the file, fill the customer details in each column – such as To, CC, Subject, Body and Attachment.
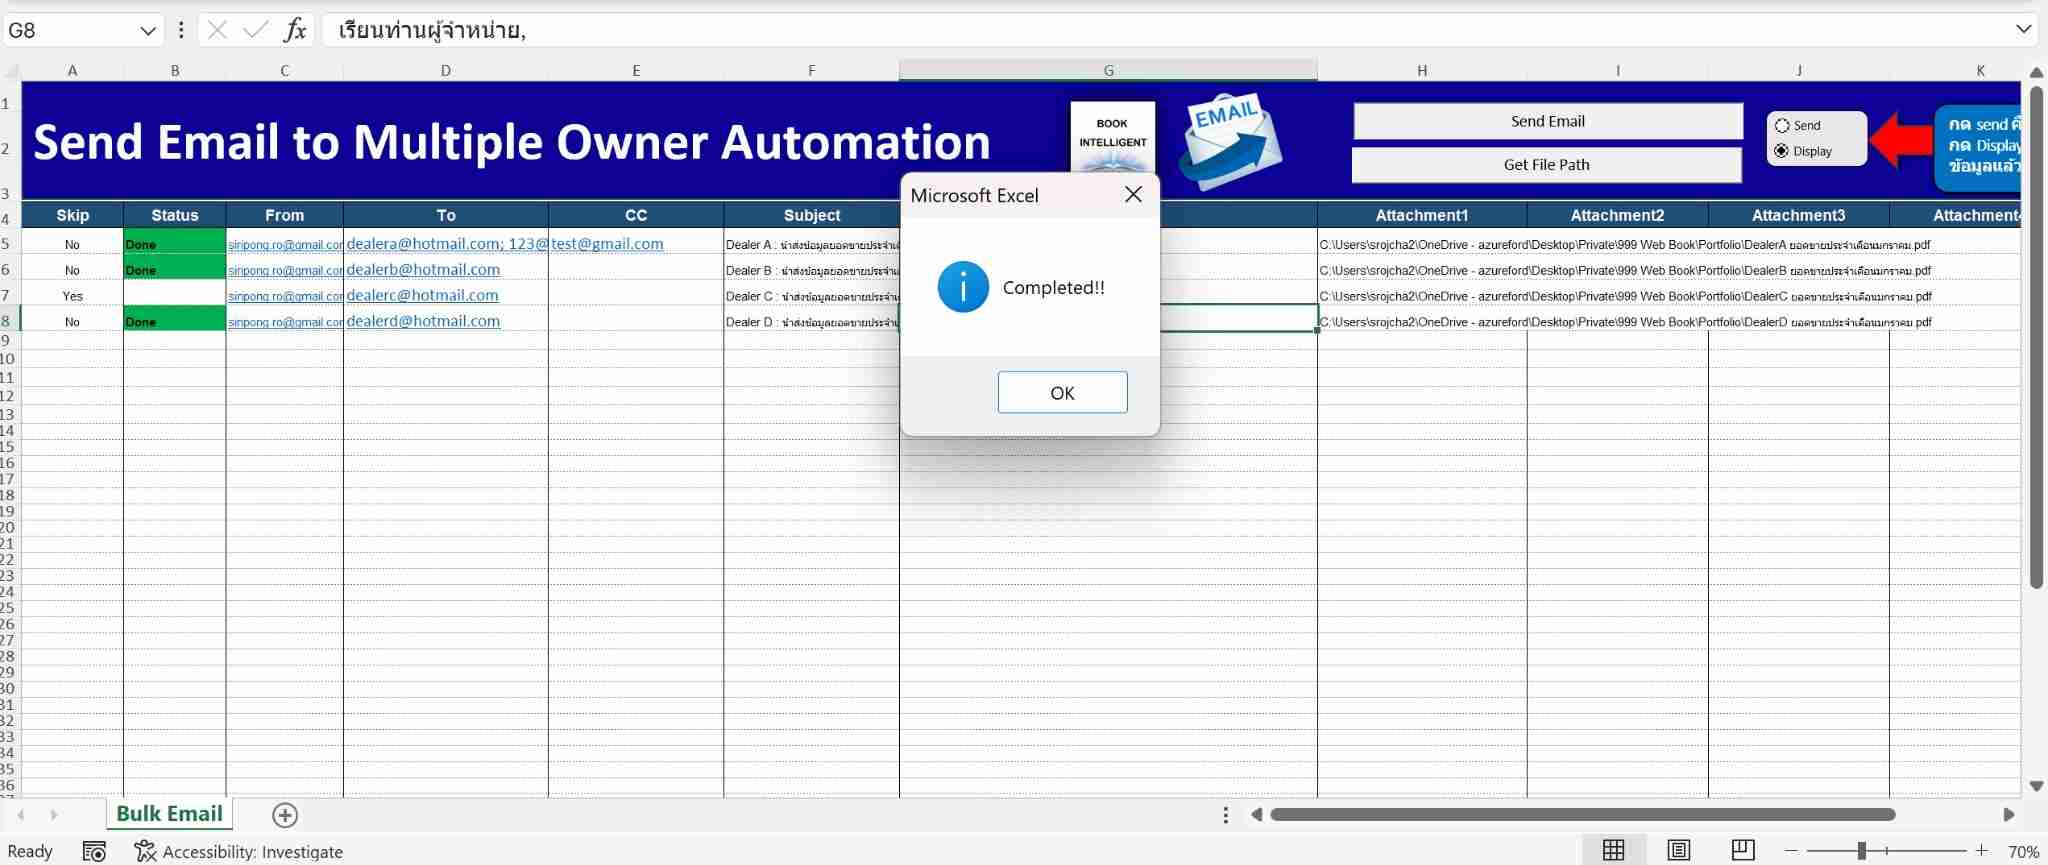
After completing the information, click the “send email” button. The VBA will run and connect to Microsoft outlook. Once the process is finished, the status will show “done” in green, indicating that the email has been processed.
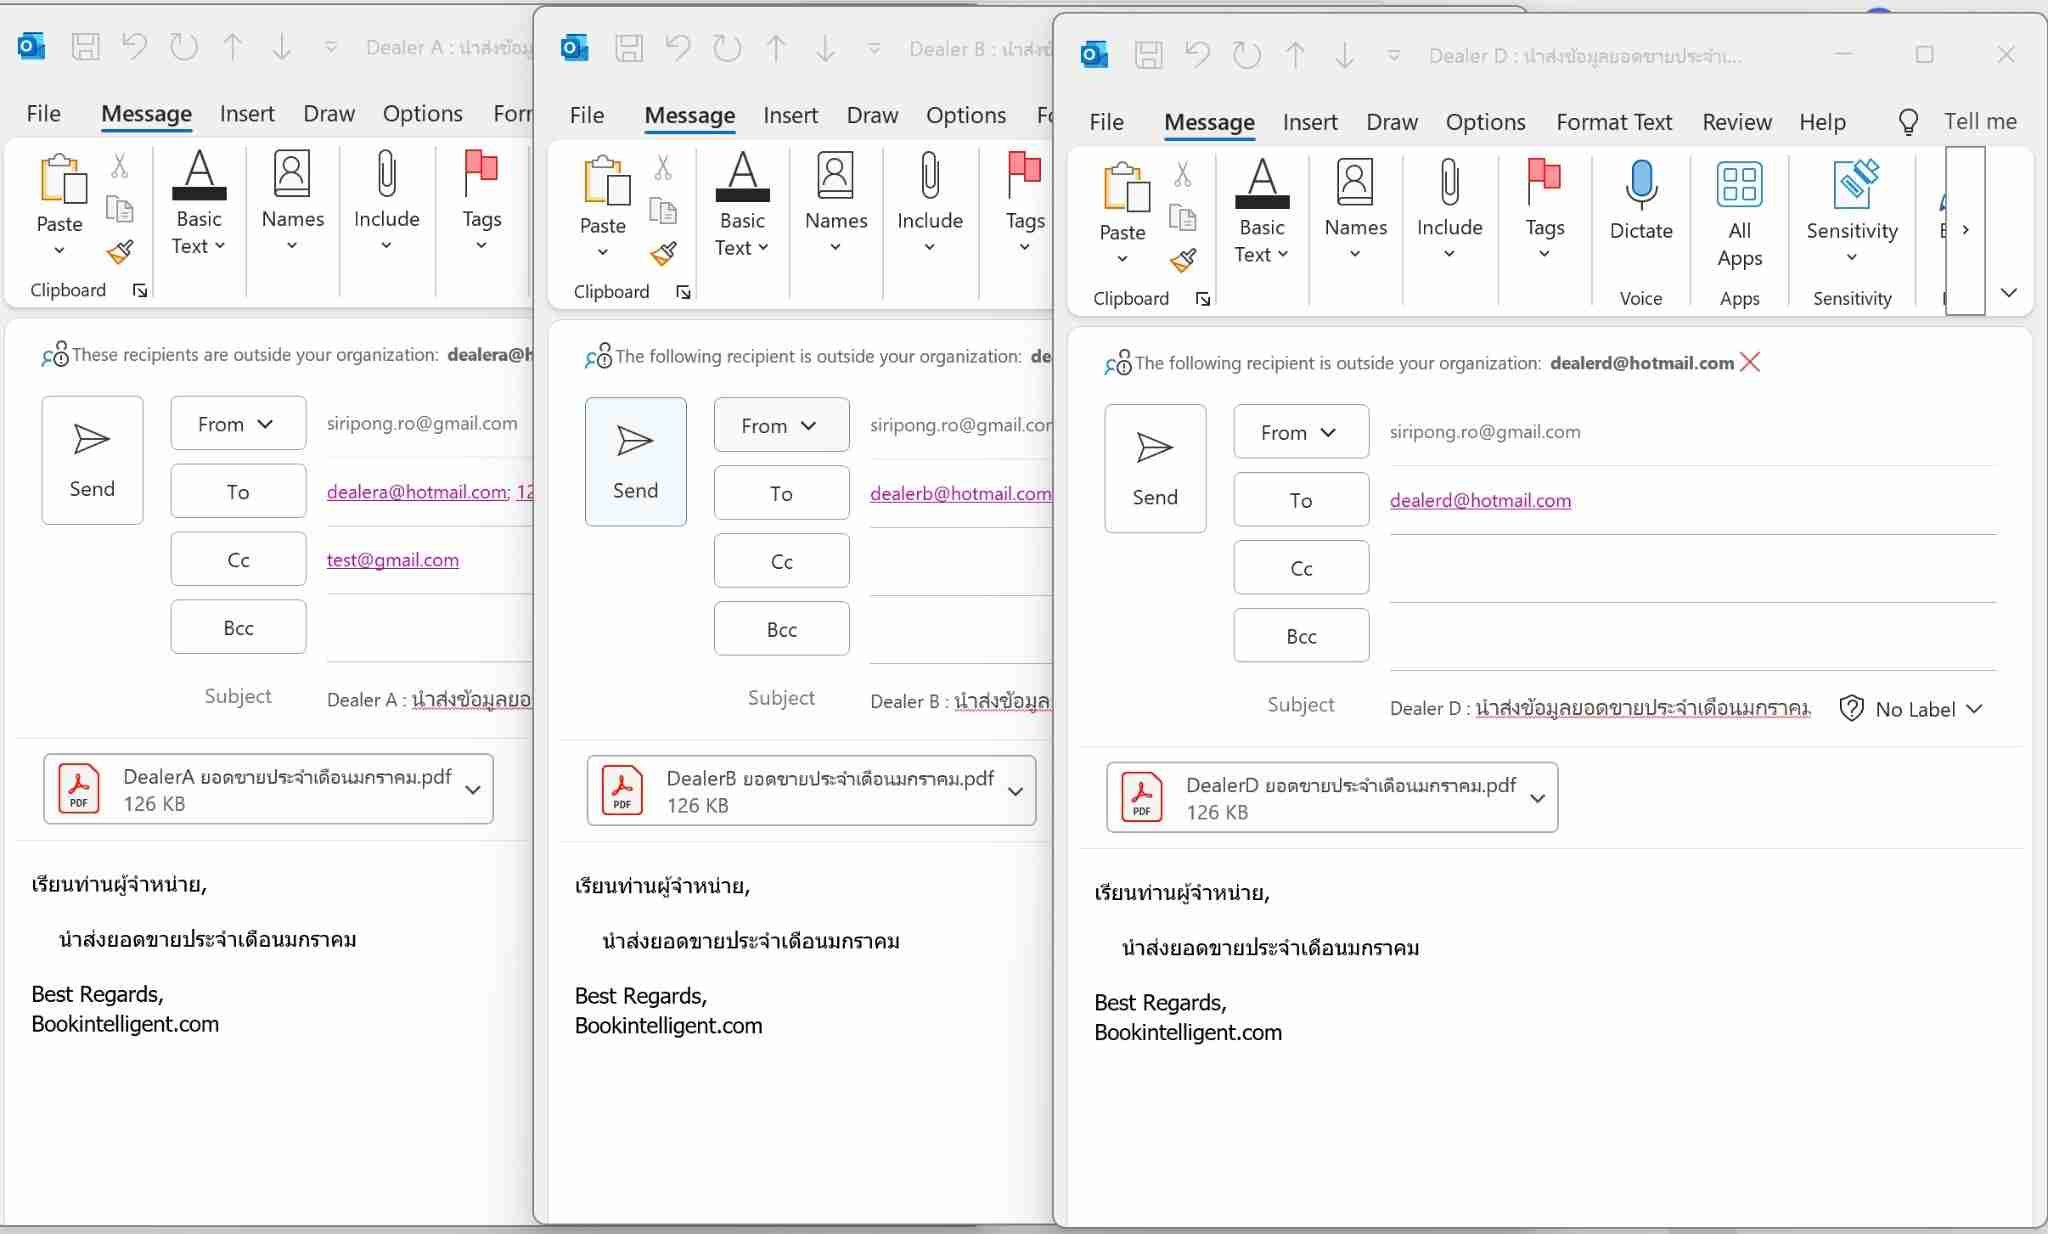
If you select “Display”, Outlook will open a preview window showing the email content, allowing you to review it before sending.
If you select “Send”, the email will be sent immediately without preview.
2.3) VBA Coding
Below is the VBA code used for sending automated emails through Microsoft Outlook. This script reads data from the excel sheet and send emails based on the information provided.
- Send_Email()
Sub Send_Email()
Dim sh As Worksheet
Set sh = ThisWorkbook.Sheets("Bulk Email")
Dim i As Integer
Dim OA As Object
Dim msg As Object
Set OA = CreateObject("outlook.application")
Dim last_row As Integer
last_row = sh.Range("D" & Application.Rows.Count).End(xlUp).Row
For i = 5 To last_row
    If UCase(sh.Range("A" & i).Value) <> "YES" Then
        Set msg = OA.CreateItem(0)
        msg.To = sh.Range("D" & i).Value
        msg.Subject = sh.Range("F" & i).Value
        msg.body = sh.Range("G" & i).Value
        If sh.Range("A1").Value = 2 Then
            msg.Send
        Else
            msg.display
        End If
        sh.Range("B" & i).Value = "Done"
    End If
Next i
MsgBox "Completed!!", vbInformation
End Sub- Get_File_Path()
Sub Get_File_Path()
Dim file_path As String
file_path = Application.GetOpenFilename(MultiSelect:=False)
If file_path <> "False" Then
    Selection.Value = file_path
End If
End Sub
3.) Get Your Free Excel VBA Email Automation Template!
📩 After submitting your email, you’ll instantly receive a download link — absolutely FREE!
📩 when you register, you can download directly (Free) 📚 Bookintelligent.com
4.) Video Tutorial: How to Use the Excel VBA Email Automation Template
I hope this article has been helpful for anyone looking to automate email sending with excel. If you have any questions or need further assistance, feel free to leave a comment or add me on line to chat. See you in the next article!!
Consult about Data?
I provide advice and training on topics such as Excel, Data Visualization, Power BI, and Dashboard creation. Feel free to contact me via:
- Line OA : Bookintelligent